The Art of Parquet Floor Sanding: What Every Homeowner Should Know
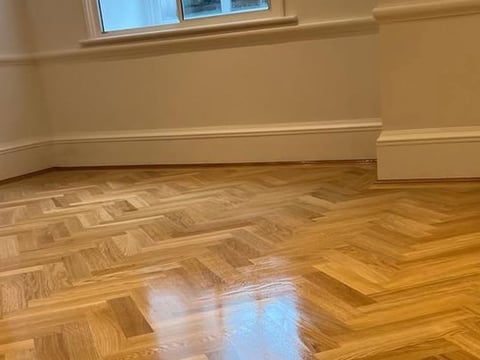
Parquet flooring has a character that few other surfaces can match. The geometric patterns, the warmth of natural wood, the sense of history it brings to a room, it is a feature worth preserving. But parquet also presents unique challenges when it comes to restoration. Unlike a standard plank floor, parquet consists of many small blocks of wood arranged in herringbone, basket weave, or chevron patterns. Each block moves independently with changes in humidity, and each one has its own grain orientation. That is why parquet floor sanding is not a job for a weekend warrior with a rental sander. It requires patience, the right abrasive sequence, and a solid understanding of how wood behaves.
Why Parquet Floors Need Special Care
Parquet blocks are typically thinner than modern engineered wood floor planks. Many vintage parquet floors were laid using bitumen adhesive or a mastic that can soften under heat. If you run a belt sander across a parquet floor without checking the adhesive first, you can gum up the abrasive in seconds. Worse, you can sand through the thin wear layer and expose the softer core beneath. That is a mistake that cannot be undone without replacing blocks.
Another factor is the grain direction. On a herringbone floor, adjacent blocks run at 90 degrees to each other. Sanding across the grain on one block leaves deep scratch marks that require a lot of work to remove. A skilled operator reads the pattern before switching on the machine. They plan the passes so that the final scratches from each grit run parallel to the long direction of the blocks, or they use a random orbital sander to avoid directional scratches altogether.
Tools of the Trade for Parquet Floor Sanding
The best results come from using a combination of machines, not just one. A drum sander or belt sander can handle the initial flatness correction on large open areas, but you need an orbital sander for the edges and the tight corners around fireplaces or door frames. For the main field, a good dustless sanding system is essential. Parquet creates a lot of fine dust, and that dust settles into the gaps between blocks. If you do not extract it properly, it mixes with the finish and leaves a muddy residue that ruins the appearance.
When it comes to abrasives, the choice of grit sequence matters. Start coarse enough to remove the old finish and any surface scratches, but not so coarse that you cut into the wood deeper than necessary. A typical sequence might begin at 36 or 40 grit, then step through 60, 80, and finish at 100 or 120 grit. For oak floor parquet, the final grit can be a little higher because oak has an open grain that responds well to a finer finish. The goal is to get a surface that feels smooth to the palm but still has enough tooth for the new coating to bond.
Gap Filling and Preparation
Parquet floors naturally develop gaps over time. Wood shrinks as it dries, and the blocks can loosen or shift. Before any finishing work begins, you should assess the gaps. Gap filling with a suitable wood filler is a common step, but you need to match the filler to the coating system you plan to use. Some fillers are designed for solvent-based lacquers, others for water-based finishes. A mismatch can cause the filler to crack or discolour after a few months.
For larger gaps, a mixture of fine sawdust from the final sanding pass and a clear binder can work well. It matches the colour of the wood exactly because it is made from the same wood. But for very wide gaps, you might need to insert a sliver of matching timber rather than rely on filler alone. That is a judgment call that comes with experience. If the floor is going to be finished with a hard wax oil like Osmo or Rubio Monocoat, the gaps will remain slightly visible because these finishes do not build a thick film. A floor lacquer from Bona or Loba, on the other hand, can fill minor gaps more effectively as it layers up.
Choosing the Right Finish
The finish you choose affects not only the look of the floor but also how it ages and how easy it is to maintain. For a parquet floor that sees heavy foot traffic, a durable floor lacquer is often the best choice. Lacquers from Bona or Loba provide a hard, clear surface that resists scuffs and can be recoated every few years without full sanding. They dry quickly, which is a big advantage in a commercial setting or a busy household.
Hard wax oils, such as those from Osmo or Rubio Monocoat, penetrate the wood rather than sit on top. They give a softer, more natural feel underfoot and are easier to repair in small areas. But they are less resistant to water and scratches. A spilled drink left on an oiled parquet floor can leave a white mark that requires spot sanding to fix. That is a trade-off worth understanding before you commit to a system.
Some floors benefit from a sanding sealer before the main coat. A sealer locks down the fibres and reduces grain raising. Grain raising happens when water in the finish swells the wood cells, making the surface feel rough after the first coat. A quick pass with a fine abrasive after the sealer solves that, but it adds time to the job. If you are working with a species like oak, which has pronounced grain, the extra step is almost always worth it.
Acclimatisation and Environmental Control
Wood is a hygroscopic material. It gains and loses moisture with the air around it. Before you start parquet floor sanding, the room should be at the same temperature and humidity it will experience in normal use. If you sand the floor in a damp environment and then the central heating dries it out over winter, the blocks will shrink and the gaps will open up. Acclimatisation means letting the wood settle for at least a week, ideally two, before you even open the first tin of finish.
This is especially important for engineered wood floor products, which have a stable core but still react to moisture changes. The top layer of a good engineered floor can be sanded lightly, but you have to know the thickness of that layer. Sanding too deep exposes the printed pattern or the HDF core, and the floor is ruined. Always check the manufacturer's specification before any sanding work.
Hand Tools and Detail Work
Not every part of a parquet floor can be reached with a machine. Around the edges of the room, under radiators, and inside built-in cupboards, you need a floor scraper and some hand sanding. A sharp floor scraper removes old finish quickly without the dust of a power tool. It also gives you fine control over how much wood you take off. For the final smoothing in tight spots, a small orbital sander or even a sanding block with the same abrasive grit you used on the main floor will keep the finish consistent.
There is a temptation to rush the hand work, but it shows in the final result. The difference between a parquet floor that looks professional and one that looks amateur is often in the corners. Take the time to match the scratch pattern and the sheen level right up to the skirting board.
Common Mistakes and How to Avoid Them
The biggest mistake people make with parquet floor sanding is using too coarse a grit too early. They want to remove the old finish fast, so they start with a 24-grit paper and cut deep grooves into the wood. Those grooves then require hours of work with finer grits to remove, and sometimes they never fully come out. A better approach is to start with a grit that is just aggressive enough to break the existing coating, then step up gradually. A good rule of thumb is to never jump more than 30 to 40 grit numbers between passes.
Another common error is not cleaning the dust thoroughly between grit changes. A dustless sanding system helps, but you still need to vacuum the floor and wipe it with a tack cloth before applying any finish. Leftover dust from a coarser grit can embed itself in the finish and create a gritty texture that is impossible to polish out.
Finally, do not overlook the condition of the adhesive. On older parquet floors, the bitumen or mastic may have degraded to the point where blocks are loose. If you sand over a loose block, it can shift under the machine and get chewed up. Before any sanding, tap each block and listen for a hollow sound. Lift and re-glue any loose blocks, and let the glue cure fully before continuing.
Final Thoughts on Parquet Floor Sanding
Parquet floor sanding is a craft that combines technical knowledge with practical skill. It is not a quick job, and it is not a cheap job if you hire a specialist. But the result, a smooth, even surface that shows off the pattern and the grain of the wood, is worth the effort. Whether you choose a hard wax oil for its natural feel or a lacquer for its durability, the key is preparation. Take the time to assess the floor, choose the right tools and abrasives, and control the environment. The floor you get at the end will reward you for decades.